Photography, an art form that captures moments in time, comes to life when paired with the right lighting. For those looking to elevate their images, studio lighting serves as a transformative element. Whether you’re a budding enthusiast or a seasoned photographer, understanding how to harness the power of studio light can revolutionize the way you take photographs.
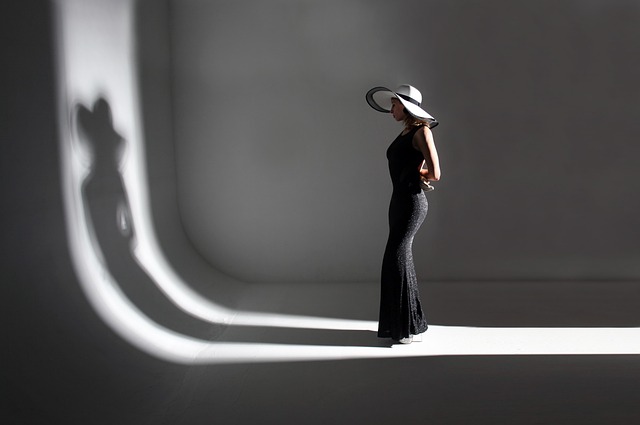
Studio lights are more than just artificial sources of illumination; they are tools that can shape, mold, and define your images. When you step into your studio, think of your lighting setup as your canvas. The interplay of shadows and highlights created by different types of studio lights can dramatically change the mood and tone of your photos. By mastering these elements, you can capture the essence of your subject in ways that natural light alone may not allow.
When it comes to studio lighting, understanding the types of lights available is key. Softboxes, umbrella lights, and LED panels each provide unique qualities of light. Softboxes offer a diffused light that fills shadows gently, perfect for portrait photography showcasing delicate features. Umbrella lights, on the other hand, create a broader spread of light, making them ideal for group shots or larger subjects. Lastly, LED panels provide versatility with adjustable intensity and color temperature, giving you creative liberty in your photography.
Utilizing studio lights effectively requires knowledge of optics and the camera settings that complement your lighting choice. Understanding how aperture, shutter speed, and ISO interact with your lighting can mean the difference between a professional-looking photo and one that’s poorly lit. For instance, a lower aperture can create a beautiful bokeh effect, allowing your subject to pop against a softly blurred background, while managing your shutter speed ensures crisp, clear images even in a well-lit studio environment.
Experimentation is crucial when working with studio lights. Start by adjusting the placement of your lights to see how it alters the shadows cast on your subject. Move the light closer for a more dramatic effect or further away for softer illumination. Don’t be afraid to try different angles and heights; each small change can yield stunningly different results in your photos. Capture a series of images to really analyze how the light interacts with your subject’s features.
Post-processing can also enhance the power of your studio lighting. Using software to adjust brightness, contrast, and color balance can further refine your work. Even the best studio light can benefit from a little digital touch-up to achieve the ideal visual impact. However, remember that the foundation should be set during your photo shoot; the editing phase is merely a way to polish your already fantastic images.
Lastly, invest in quality equipment that suits your needs. Good studio light doesn’t have to break the bank, but it should provide reliable performance. As you continue to grow in your photography journey, you may find yourself upgrading to more sophisticated lighting setups, but starting with the basics will give you a solid foundation to build upon.
Embrace the art of studio lighting—learn its secrets, experiment with its possibilities, and let it unlock new dimensions in your photographic journey. With practice, patience, and passion, you can create stunning visuals that reflect the beauty of your subjects through the magic of studio light.