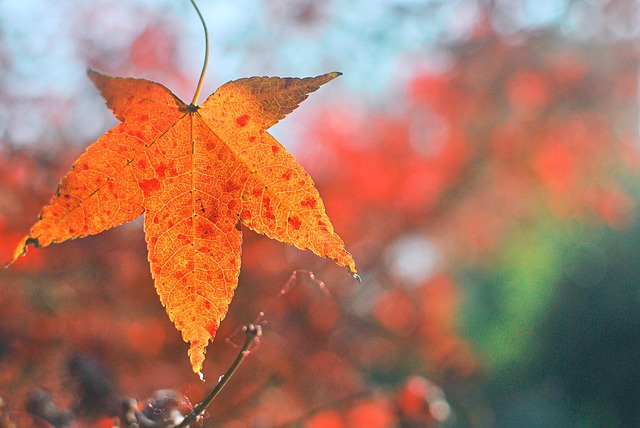
The Lomo effect is a photographic style that emerged from the popular Soviet Lomography cameras. It is instantly recognizable by its high contrast, saturated colors, circular bokeh, and often exaggerated lens distortions. While modern cameras can replicate many of these traits digitally, the most authentic way to capture the Lomo look is through controlled exposure and creative shooting techniques. In this article we dive into the specific exposure tricks that can transform a simple snapshot into a vivid, almost painterly image that feels like a spontaneous Lomo flash. The focus will be on practical camera settings, lens choices, and in‑camera tricks that give you that unmistakable, dream‑like feel without the need for heavy post‑processing.
Understanding the Core of the Lomo Effect
Before you can manipulate exposure to achieve the Lomo effect, it helps to understand the three main characteristics that define it:
- High Contrast – The image’s shadows are deep and highlights are bright, creating a dramatic visual punch.
- Vibrant Color Saturation – Colors are pushed beyond their natural range, giving a surreal, cartoonish quality.
- Circular Bokeh and Lens Distortion – The round, soft background blur and slightly curved lines add a whimsical, almost playful touch.
These elements can be orchestrated through exposure settings alone, or by combining exposure with the right lens and intentional use of the camera’s flash or lighting. By mastering each of these areas, you gain full creative control over the final image.
Exposure Settings that Emulate Lomo Vision
ISO: Push to the Limits
One of the simplest ways to achieve a high contrast, saturated look is by raising the ISO. Modern DSLRs and mirrorless cameras can handle ISO values up to 3200 or even 6400 without excessive noise. For a pure Lomo feel, setting the ISO between 800 and 1600 is often enough. This not only increases the brightness but also introduces a slight grain that mimics the filmic texture of vintage Lomography films.
Aperture: Wide and Dreamy
Using a wide aperture (f/1.8, f/2.0, or f/2.8) creates a shallow depth of field, which is essential for that dreamy bokeh effect. The wider the aperture, the softer the background and the more pronounced the subject isolation. Aim for a focal length between 35mm and 50mm on a full‑frame sensor; this combination preserves perspective while allowing a natural, flattering look.
Shutter Speed: The Time Trick
To keep the image lively, choose a moderate shutter speed. A setting of 1/125 or 1/200 seconds will capture motion crisply enough to avoid blur but still allow for slight motion artifacts when you need a sense of movement. If you’re shooting in low light or want to capture long exposures for artistic streaks, try 1/30 or even 1/15 seconds, balancing ambient light with the camera’s ISO.
Lens Selection and Distortion Play
The lens you choose dictates much of the visual character of the Lomo effect. While you can use any lens, certain focal lengths and designs inherently produce the circular bokeh and distortion associated with Lomography.
- Prime Lenses 35mm–50mm – These focal lengths keep distortion subtle and maintain a natural field of view.
- Vintage or Retro Lenses – Lenses with older optical designs, such as 50mm f/1.4 or 28mm f/2.8, often have soft focus and color casts that echo the vintage film style.
- Wide‑Angle Lenses with Distortion – If you want a more exaggerated look, a 14mm–24mm lens will introduce the classic “curved” lines of the Lomo aesthetic.
Don’t overlook the role of the lens hood or an off‑camera diffuser. Removing the hood can allow light to spill onto the sensor in unique ways, adding subtle vignetting and contrast to the edges.
Creative Composition Techniques
Exposure tricks alone won’t guarantee a Lomo look if the composition is flat. Here are some compositional ideas that naturally complement the high contrast, saturated style:
- Rule of Thirds – Place your main subject off‑center to create dynamic tension.
- Leading Lines – Use roads, fences, or architectural lines to guide the viewer’s eye toward the focal point.
- Overexposed Highlights – Intentionally overexpose a bright area to produce a halo effect, characteristic of the Lomo flash.
- Foreground Interest – Add a small, vivid element in the foreground to give depth and contrast.
These compositional tools, combined with the right exposure settings, amplify the surreal feeling of the image.
Flash and Lighting Tricks for the Lomo Glow
Use a Flash for a Quick Glow
Many Lomography cameras used built‑in flash units that added a bright, slightly diffused light to photos. To replicate this, use your camera’s built‑in flash with a diffuser, or add an LED panel with a soft diffuser. Set the flash to a low power level (about 10–20% of the maximum) to avoid harsh shadows.
Ambient Light and Golden Hour
Capturing photos during golden hour (the hour after sunrise or before sunset) offers warm, low‑contrast light that can be accentuated by a higher ISO. The resulting images carry a natural Lomo glow without the need for flash.
Creative Light Painting
Hold a flashlight or LED light and move it across the frame while shooting at a slow shutter speed (1/30 or slower). This technique creates vivid streaks of light that feel reminiscent of Lomo’s high contrast imagery.
Practical Exposure Tips for On‑The‑Go Shooting
When you’re in the field, you can’t spend hours adjusting settings. Here’s a quick reference to keep the Lomo effect coming:
- Set ISO to 800–1600 and keep the camera on auto-exposure mode.
- Open the aperture as wide as your lens allows (f/1.8–f/2.8).
- Choose a shutter speed that matches the movement of your scene: 1/125 for walking crowds, 1/30 for a subtle blur.
- Enable HDR mode if available to preserve detail in both shadows and highlights.
- Use the camera’s “film simulation” feature (if present) to apply a pre‑built Lomo preset.
These quick settings will keep your camera in “Lomo mode” without needing a full manual adjustment each time.
In‑Camera Post‑Processing: The Quick Fix
While you can emulate the Lomo effect entirely in-camera, a few last‑minute tweaks can polish the image:
- Contrast – Increase the contrast slider until the shadows appear almost black.
- Saturation – Push saturation until the colors feel punchy but not washed out.
- Color Balance – Shift the balance toward warm tones (reds and oranges) for a classic Lomo vibe.
- Sharpness – Apply a mild sharpening to bring out texture without breaking the film‑like look.
Many cameras now offer a “Lomo” preset, which automatically applies these adjustments. If your camera lacks this feature, simply use the manual sliders to replicate it.
Common Pitfalls and How to Avoid Them
Even seasoned photographers can fall into traps that ruin the Lomo aesthetic. Keep an eye on these pitfalls:
- Over‑exposure – Too much brightness will flatten colors and wash out contrast. Use exposure compensation to fine‑tune.
- Under‑exposure in High ISO – While high ISO adds grain, excessive under‑exposure can cause noise to dominate the image. Aim for a balance.
- Sharpness Overload – Sharpening too aggressively can break the soft, dreamlike quality. Keep the sharpening mild.
- Unnecessary Filters – Avoid heavy color filters that can distort the natural vibrancy of the scene. Stick to simple color adjustments.
By staying vigilant against these issues, you’ll keep your images looking fresh and true to the Lomo style.
Case Study: A Street Portrait Session
Imagine you’re shooting a candid street portrait in a bustling city. You want that instant Lomo vibe, but you’re on a tight schedule. Here’s a step‑by‑step guide for the scene:
- Set the camera to aperture priority mode, selecting f/1.8.
- Choose ISO 800, then set the shutter speed to 1/125 (the camera will auto‑adjust).
- Use the built‑in flash with a diffuser, set at 15% power.
- Compose the subject off‑center, using a wide street as a backdrop.
- Once the image is taken, apply the camera’s Lomo preset, or manually tweak contrast, saturation, and color balance.
- Export the photo and preview. If needed, make a slight adjustment to the saturation for a final punch.
The result is a portrait with a sharp subject, a soft, circular bokeh background, vibrant colors, and a lively contrast—all in a single shot.
Final Thoughts
The Lomo effect is a delightful blend of high contrast, saturation, and playful distortion. By mastering exposure tricks—particularly ISO, aperture, and shutter speed—you can capture this style directly from your camera. Combine these settings with the right lens and a dash of creative composition, and you’ll produce images that feel instantly nostalgic and artistically vibrant. Remember, the key is to keep things simple: use a wide aperture, a higher ISO, and moderate shutter speeds, then let your camera’s in‑built presets or quick post‑processing adjustments polish the final look. With practice, the Lomo effect will become an intuitive part of your photographic toolkit, allowing you to add a splash of color and emotion to every shot.


