Macro photography invites photographers to peel back the ordinary and reveal the extraordinary details hidden within everyday subjects. When shooting at such close range, lighting is no longer a background convenience—it becomes the principal sculptor of texture, depth, and mood. A well‑planned light source can transform a dull speck of dust into a shimmering gem or a simple flower petal into a work of art. This guide explores practical lighting techniques that elevate your macro work, focusing on how to harness natural and artificial light, control shadows, and fine‑tune exposure for maximum clarity and visual impact.
Choosing Light Direction
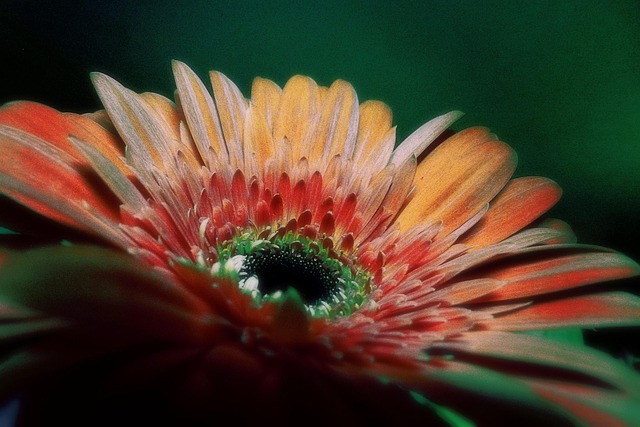
In macro photography, the direction of light relative to the subject shapes the entire image. Front lighting flattens textures but eliminates shadows, producing a clean, bright look—ideal for subjects like insects or small glass objects where detail clarity is paramount. Side lighting, on the other hand, adds dramatic contrast and highlights ridges, useful when you want to accentuate surface patterns such as a bee’s antennae or a leaf’s veins. Top lighting often creates harsh shadows that can obscure fine detail, while backlighting can produce a halo effect around transparent or translucent subjects, like a dew‑laden spiderweb.
- Front lighting – minimal shadow, high detail.
- Side lighting – accentuates texture, strong contrast.
- Back lighting – creates rim light, perfect for transparency.
- Mixed lighting – combine angles for balanced results.
Natural Light Techniques
Natural light is the most accessible resource for many macro enthusiasts. Its softness depends on the sun’s position and weather conditions. Early morning or late afternoon sunlight offers a golden hue and elongated shadows, which can add warmth and dimension to small subjects. Overcast days provide diffused light that reduces harsh highlights and shadows, ideal for capturing delicate textures like butterfly wings or the delicate filigree of a tiny jewelry piece.
- Use a large window to bounce indirect light onto the subject.
- Place a white sheet or a translucent diffuser between the light source and the macro lens.
- Experiment with time of day to observe how color temperature shifts affect your composition.
Artificial Light: LED Panels and Ring Lights
When natural light is insufficient or unpredictable, artificial lighting offers control and consistency. LED panels provide adjustable color temperature and brightness, allowing you to fine‑tune the light to suit the subject’s color balance. Ring lights, especially those designed for macro lenses, create even illumination around the subject and reduce the need for additional light modifiers.
- Adjust the panel’s angle to switch between rim lighting and flat illumination.
- Use a diffuser hood to soften the LED’s hard edges.
- Position the ring light so that it surrounds the lens, minimizing lens flare and providing uniform coverage.
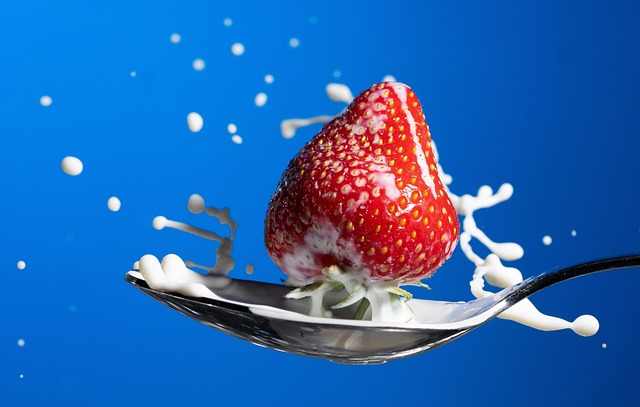
Diffusion and Softening Strategies
Soft light is often preferable in macro photography because it reduces harsh shadows and brings out subtle tonal variations. Diffusion materials such as parchment paper, milk cartons, or specialized softboxes can transform a hard light source into a gentler, more flattering one. For very small subjects, a tiny umbrella or a small softbox placed close to the light source can create an evenly lit environment without the bulk of larger modifiers.
“A well‑diffused macro image feels more natural, as the viewer’s eye is guided by gentle gradients rather than abrupt shadows.”
Using Reflectors to Enhance Light
Reflectors are inexpensive yet powerful tools for manipulating light. They can fill shadows, add bounce light, or alter the color temperature by using colored reflective surfaces. The most common reflector types include white, silver, gold, and black. In macro setups, a small white reflector placed on the opposite side of the light source can soften shadows without overpowering the subject, while a silver reflector adds crisp highlights that accentuate fine details.
- Place the reflector at a 45‑degree angle to the light source and subject.
- Experiment with different reflector colors to see how they shift the mood.
- Use a soft surface, such as a towel or foam, to further diffuse reflected light.
Managing Shadows and Depth
While some shadows can enhance texture, excessive darkness may hide important details. In macro photography, even a subtle shadow can add depth to a composition, but the balance is critical. If shadows become too pronounced, increase the distance between the light source and the subject, or add a secondary light source to fill in the darker areas.
“In macro, shadows are the silent storytellers; control them, and you control the narrative.”
Exposure and Timing: The Final Touches
Lighting is only part of the equation; exposure settings dictate how the light interacts with the sensor. Macro lenses often require precise exposure due to the close working distance and the resulting small aperture settings. Start with a low ISO to reduce noise, and adjust the aperture to control depth of field—shallow for isolation, deeper for context. Use a tripod and a remote shutter release to avoid camera shake, especially when the exposure time is extended to balance soft light.
- Shoot in RAW to retain the full dynamic range.
- Use exposure compensation to fine‑tune brightness in tricky lighting conditions.
- Review histograms to ensure highlights and shadows are within acceptable ranges.